Don’t Forget the Ceilings
by Jonathan McGaha | 5 September 2013 12:00 am
Expanded metal ceiling tiles can dramatically alter the look of a room
When you’re changing the personality of your offices, don’t forget the ceilings! A very simple and easy-to-make change that dramatically alters the look of a room completely is to utilize expanded metal ceiling tiles. These can be produced to size so that they easily drop into the same gridwork used by acoustical tiles. And the real beauty is that “you pick the look!”
Expanded metal ceiling tiles are produced in a variety of materials: copper or other red metals, aluminum or carbon steel. In the case of copper, the finish is beautiful in its own right. With aluminum, the panels can be left as they are or anodized to virtually any color desired. The same is true of carbon steel which can be powder coated as desired.
In some applications, the mechanicals (HVAC, conduit, etc.) that are above the ceiling can be painted black to effectively hide them behind the open tiles. This is a particularly attractive option in new construction or a larger remodeling job. In several installations, this procedure was followed to very good effect.
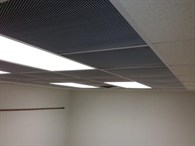
In photo 1, steel tiles with a 5/16-inch opening were powder coated white and placed on a new grid to create a unique ceiling. This was a new construction and prior to installing the grid, the recess and all mechanicals were spray painted matte black. All the ductwork and electrical was run, but none of the light fixtures or HVAC vents were installed until after painting. Next the grid is hung as in all other suspended ceiling installation.
As in other installations, it is imperative that the tie-wires be tight and the grid-work level at this stage because the expanded metal tiles may be less rigid or lighter weight than similarly sized acoustical tiles. Once the installation is true and level, light fixtures, vents and the expanded metal tiles can be installed. Regarding tile installation, the only consideration to pay particular attention to is “orientation.”
Expanded metal is “directional” and if all the tiles are not put in in the same orientation, the look will not be correct. Clearly, with 24-inch squares, the tiles could go in with the “Long Way of the Diamond” (LWD) disoriented to the “Short Way of the Diamond”
(SWD). This is the easy part of the orientation. The “leading edges” must all be oriented toward the same direction or there will appear to be solids in the installation.
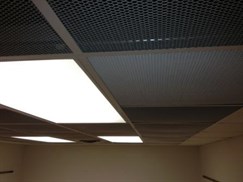 As can be seen in photo 2 of the same ceiling, one tile was intentionally reversed and the error is plain to see. This is generally not an issue for the installer because when tiles are shipped, they are stacked and will only nest up (mesh together) if the leading and trailing edges are aligned with themselves. So long as the installer takes the panels from the stack and installs them in the same orientation, it will go very smoothly. Once done, it will also be easy to determine which tiles are disoriented.
The options are there. With an understanding of available materials, the ability to dramatically impact the “look and feel” of a room is limitless. Expanded metal ceiling tiles are one option that needs to be considered. Tiles are available in 24- by 24-inch or 24- by 48-inch sizes and can be cut to size easily with tin snips. They are available in a wide array of materials from aluminum,and red metals to powder coated steel in a myriad of colors.
Rick Bahner is managing member of Expanded Solutions LLC in Oklahoma City. For more information,
visit www.expandedsolutions.com.[1]
- www.expandedsolutions.com.: http://www.expandedsolutions.com.
Source URL: https://www.metalconstructionnews.com/articles/dont-forget-the-ceilings/