Louvers are much more than just an architectural accent for your building. In addition to controlling airflow, louvers can help save on heating and cooling costs, while adding to LEED credits. Louvers come in a variety of shapes, colors and styles, and are either stationary or operable. While louvers are usually maintenance free, it is necessary to make sure that they are installed correctly.
Most louvers are shop-assembled, requiring very little fieldwork. And, according to Brett Reinhardt, LEED Green Associate, marketing manager at Delano, Minn.-based Industrial Louvers, most louvers are installed the same way, regardless of type. “There may be some exceptions for Florida approved or Dade County louvers as these louvers have been tested and engineered to meet wind and impact loads,” he notes. It is important to make sure that those louvers are installed in accordance with the Florida or Dade County approved drawings.
Luke Brandt, project manager at Kovach Building Enclosures, Chandler, Ariz., notes that the main difference between operable and stationary louvers is the electrical component. Operable louvers activated with an electrical motor need to be wired into the building’s electrical system to operate properly.

Proper Sizing
One of the main issues in louver installation is that actual field conditions do not match the architectural or submitted drawings. “It is important for the installing contractor to verify all aspects of the louver submittals to ensure that the product is fabricated correctly and can be installed without complications,” Reinhardt says.
By planning at the beginning project phases to guarantee dimensions and having the previous subcontractors monitor openings is a guaranteed way to ensure success, according to Brandt. The environment in which the louver is being installed also needs to be taken into account.
According to Reinhardt, this includes looking at whether you have access to the space behind the louver to install the attachment hardware. Is the wall deep enough to ensure that installation hardware fits? Are the surrounding conditions adequate to support all loads imposed by the louver including dead loads, wind loads, etc., which are typically determined by the project engineer of record? Additionally, the surrounding conditions shown on the louver submittals need to match what is in the field, Reinhardt adds.
Shop-assembled louvers will arrive on-site fully assembled and ready to install. Once the louver size and surrounding conditions have been verified, Brandt notes that the louver opening needs to be properly waterproofed/flashed before installation. All necessary steel or studs should also be in place for attachment.
Next, install the attachment hardware into the opening along with any flashing for the opening. “The louver should then slide into the opening and be fastened at the rear,” Reinhardt explains. “Once the louver is secured, the perimeter of the louver should be caulked.”
 Minimal Tools Required
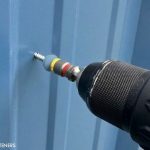
Minimal tools are required to install louvers. For unitized louvers, those include basic hand tools such as a tape measure, levels, hammers and screw guns. Additionally, a drill will be required to predrill any holes for fasteners. “A screw gun with various bits will also be required,” adds Reinhardt. “Shims may also be required so that the louver may be installed plumb into the opening. Caulking equipment is necessary to seal the louver with the surrounding conditions.”
When installing louvers on a concrete or brick building versus a metal building, Brandt says that typically the only difference is the type of fastener used to secure the louver. “Typically a self-tapping screw is used in a metal building and nail in or tapcon will be used into concrete,” he says. Reinhardt notes that Industrial Louvers tries to maintain continuity in attachments so similar hardware can be provided regardless of the substrate.
“Typically it is the installing contractor’s responsibility to supply the necessary fasteners used to attach the louvers to the various substrates,” he explains. He goes on to note that special attention should be paid to edge distance, anchor embedment, and anchor spacing when installing into concrete or CMU. Additionally, many anchor manufacturers have guidelines to follow.
According to Reinhardt, there are other cases where frames may be altered to attach to various building types. “This is most common in applications where the louvers are installed in a curtainwall,” he explains. “If this is the case we will add a glazing adapter so that the louvers may be glazed in similarly to how glass is installed in the opening. Custom extrusions can also be added to the louvers for integration with metal wall panels for tongue-and-groove installation, etc.”
Certified Performance
The Air Movement and Control Association International (AMCA) tests and certifies louvers and other air movement and control equipment. Manufacturers must submit products for testing verification to an AMCA-owned and -operated laboratory to maintain a ratings certification. Licensed product lines are subject to retesting every three years, where published performance is checked for accuracy and validity. An AMCA Certified Ratings Seal gives the buyer, specifier and end-users assurance that published ratings are reliable and accurate.
|
Custom Louver Design When the UC Davis Medical Center in Sacramento, Calif., needed more parking, the only functional site was to put a parking garage right in the front, near the entrance. The seven-level Parking Structure III adds 1,200 spaces, and features advanced parking technology, along with up-to-the-minute LED parking availability counts. The interior of the garage also has lots of natural light for security and safety, thanks to the multivalent louvered screens that veil the structure. Jason A. Silva, AIA, LEED AP, partner/design principal at Dreyfuss & Blackford Architects, Sacramento, proposed the louvers as a solution to two challenges: privacy for the patient rooms and screening of the structure from the street. To accomplish these goals, Silva had to design a custom profile. “The profile was too big for a single extrusion, but it worked since the extrusion was able to be mirrored and interlocked,” he says. Working in Autodesk Revit with Rhino, the louver composition underwent numerous iterations before the final design was realized, a process that took a few months. “This is a process that runs parallel to the technical design work,” he explains. “The louver concept came about after numerous other options failed to inspire us. The louver layout was massaged numerous times before the final fabrication.”
On the parking structure’s southern elevations, which face the street, the fins tilt out from the top, bouncing light into each floor level while reflecting color and light from the outside street. On the elevations facing the hospital the fins are angled out at the bottom to maintain patient privacy, while allowing visibility down to the street. The space that’s created by the large projection from the face of the building-anywhere from 12 inches up to 15 feet offset-allows light to travel down to the lower levels and reflect back into the garage. Since the louvers were shop-assembled into 10-foot-high panels, Silva notes that installation went very quickly, as they only needed to be bolted into the steel frame. Photography: Rien van Rijthoven |

 The final design features nearly 4,000 louvers that cover the façade slope at varied angles, casting changing shadows throughout the day, not only reflecting the campus’ dense tree canopy, but also giving the appearance of a DNA chart. “The louver pattern follows a wave form that shifts from row to row,” Silva adds. “The varied angles that open into each floor helps distribute more even light on the inside.”