Seaming a Standing Seam Metal Roof
by Jonathan McGaha | 30 June 2016 12:00 am
Information on the importance of the roof seamer
 For the most part, the standing seam metal roofs you commonly see on buildings and homes all across the United States of America, originated in the 1960s. However, standing seam metal roofs date further back to the early 1800s. There are even references to metal roofs in biblical times. Noted for its durability and resistance to high winds and snow loads, it is not surprising that the standing seam metal roof is becoming the only roof system many owners will consider.
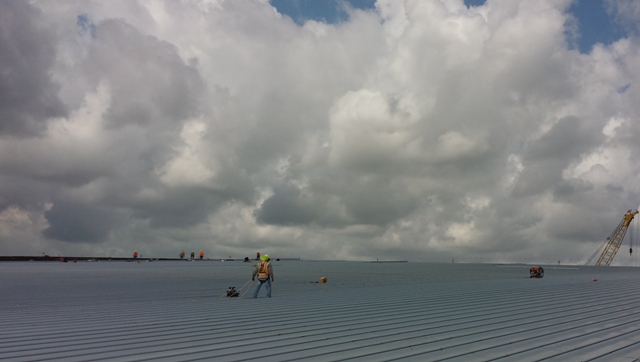
There is often the assumption that once a standing seam metal roof system has been installed, all that is remaining is to place any old roof seamer on the roof to complete the job. Nothing could be farther from the truth. The way one achieves the perfect roof, is in the preparation. Being that there are hundreds of different manufacturers with many different panels, machine and tooling setups are almost endless. Today’s electric roof seamer has many different materials, gauges, seam heights, end laps, clips and slope designs to compensate for, than just a few years ago.
Preparation
Before the roofing process begins, a manufacturer, contractor or roofer will need to make contact with a standing seam roof seamer supplier to begin the order process. The supplier will request information that details the exact roofing system it is installing. A roof seamer will then be prepared and setup for that specific roof panel and application. Most manufacturers require that the roof installer seam as they install the panel. Check with your panel manufacturer or rollformer manufacturer before panel installation begins.
Once you receive the roof seamer that has been configured and prepared specifically for your panel and its application, it is now time to begin preparing for the actual seaming process. Most standing seam roof panels will require that a limited portion of the roof seam is pre-crimped at select locations. Being that panel clips can be of a different material and thickness, pre-crimping at the clips may be required by some manufacturers. In addition, considering the various roofing systems available, the roof installer will most likely need to crimp up to 14 inches to a 90-degree finished seam, and if he is working with a double-lock style roof, he may need to crimp the first few inches of the starting area of your roof to a 180-degree seam as well.
Process
One of the more common issues that presents itself with roof seaming are the elements you are working in on a given day. The process of seaming a roof requires that metal material is placed between tooling and folded to the required manufacturer’s specifications. If your roof is littered with dirt, dust and particles, the seam result could be less than desirable and also outside of the panel manufacturer’s specification. It is imperative that your roof seam is clean and free of all debris.
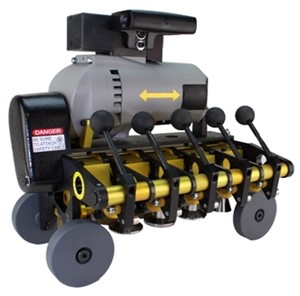
Depending on your specific roof system, you will most likely be supplied with an electrically powered three-, four- or five-station-powered seaming machine. Your roof seamer supplier will be able to assist you with the best machine for your application. Each machine is designed for different and unique panel systems.
Always ensure that all safety measures are being taken for all people, directly and indirectly, involved in the job. Attach a tether rope to a secure location and to the roof seamer, to prevent it from falling from the roof to the ground.
Powering Up
The electric motors that power roof seamers are working under extreme pressures. Confirm that you are using an adequate power source and power cord, then place the seamer on the seam. Some roof seamers are single direction and some are bi-directional. Whichever the case, ensure that the seamer is positioned on the panel as directed by the panel manufacturer or roof seamer supplier. Now lock your seamer onto your panel. Depending on your roof system, your rental seamer could have anywhere from one to five locking handles. Lock your seamer onto your roof panel, in the order or sequence, per the instructions.
Attach the power cord to the unit and turn the unit on for one to two seconds. Study the seam and confirm that the seamer is providing you with the desired seam. If all is well, turn the unit on and let it run the length of your seam. As the unit approaches the end of the run, the operator needs to be securely positioned so that he can lift the seamer off, as it finishes the seam. Stopping the seamer short of the panel end may be required in some situations. If this is the case, the seam may need to be completed with manual hand seamers.
You are now ready to seam your roof. Remember that tooling needs to be monitored and cleaned daily for debris and mastic. Once your seaming is complete, you will have a long-lasting, beautiful roof.
Chris Curtis is a sales representative at D.I. Roof Seamers, Corinth, Miss. For more information, visit www.diroofseamers.com[1].

- www.diroofseamers.com: http://www.diroofseamers.com
Source URL: https://www.metalconstructionnews.com/articles/seaming-a-standing-seam-metal-roof/