A standing seam roof-to-wall transition is a seamless roofing to wall cladding transition utilizing a standing seam roofing product. It is quickly becoming a favored design element and utilized by many design professionals due to its clean aesthetic lines, apparent seamlessness and continuity over the building envelope.
Getting the details right to prevent poor performance

Despite this transition looking like a simple installation, it is quite difficult to complete correctly. There are many elements to this system that can be mis-detailed, easily ignored or mis-installed that will cause the entire system to leak, oil can or twist and turn due to thermal movement. In addition to correct detailing, some major concerns in specifying this system are thermal cycling, moisture limitations and installation-related issues

Thermal Design Considerations
Thermal movement is a major design concern of any metal system. A metal panel, be it installed on a wall, roof or soffit, must be able to expand and contract along with the ambient temperatures that it is exposed to. A thermally locked metal panel will attempt to thermally cycle within its confines, which in turn, may cause premature fastener backout, oil canning or system failure. In the roof-to-wall transition, the eave or edge where the panel folds from the roof to the wall becomes a point of fixation. This transitional point-of-fixation will not allow the panel to thermally expand and contract along its typical axis and it is unable to be cut or altered. This being the case, the panel must be allowed to expand up-slope and a floating ridge detail must be used. See Figure 1.
Keep in mind that because the panel must expand against gravity, there are certain restrictions that come in to play with panel length and slope. Additionally, a thicker gauge may be used to extend the limitations of these variables. Since steel can thermally expand 1/16-inch to 1/8-inch per 10 feet of panel run, the expanding ridge condition must also account for the appropriate amount of thermal movement with an appropriately sized ridge cap. Similarly, on the wall side of the panel run, the panel must be allowed to expand down the outer side of the wall towards the foundation.

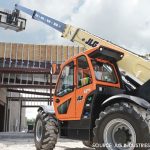
Kneecap Installation Over the Cut Ribs
After the panel is installed on the roof, the panel legs are cut and the panel is allowed to fold down the side of the structure under its own weight where it now becomes wall cladding. There are now cuts in the panel ribs resulting in a compromised panel. The openings left by the cut ribs must be covered. This is done with kneecaps. Kneecaps are essentially L-brackets that are installed to cover the panel rib and act as the primary source of waterproofing at the roof-to- wall transition and maintain a constant seam appearance. The kneecaps must be manufactured out of the same material as the metal panel to maintain a congruent warranty and paint color. Additionally, this will ensure that from a distance the transition is as seamless as possible. See Figure 2.

Moisture Design Considerations
Moisture issues often manifest in the kneecap detail. A seamless metal panel itself is inherently waterproof, but the kneecap is a secondary covering relying on pop-rivets and sealant. Kneecaps are not as effective in a snowy environment because of the ice dam effect and thermocycling. Moisture present in the kneecap detail can freeze and thaw within the kneecap and over time cause the joint to rupture. Additionally, snow sheer loads are a concern as the snow falls off the roof can strip the knee caps off in one fell swoop. Roof-to-wall transitions must be used with extreme caution in snowy environments. See Figure 3.
Installation Considerations
Installation is critical to any system and this detail is no exception. A major issue is how to support the un-installed portion of the panel as it is run off the roof prior to the ribs being cut and folding down the wall. On short panel runs, this is not an issue but on anything over one story, the installer may want to utilize a scissor lift to support the panel end prior to cutting the ribs and then slowly walk the lift down after the ribs are cut, ensuring that the panel bends straight.
Additionally, the timeless adage of “measure twice cut once” comes into play. Hopefully the installers have double and even triple checked their layout lines. There is no replacement for having experienced installers for this difficult transition.
Jeffrey Medeiros is the architectural representative for AEP Span Sacramento, Calif., and is a licensed contractor who has been supporting architects in California for over 10 years. Medeiros holds various degrees including Law and Society from the University of California- Santa Barbara, Japanese from Waseda University in Tokyo, and he attended McGeorge School of Law in Sacramento, Calif. He is fluent in all types of roofing systems. To learn more about AEP span, go to www.aepspan.com.

Figure 1.

Figure 2.

Figure 3.