A watertight seal is critical to the long-term, leak-free performance of a metal roof
A watertight seal is critical to the long-term, leak-free performance of a metal roof

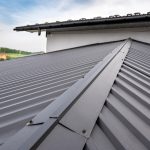
Installing an EPDM heat-resistant pipe boot on a standing seam metal roof. (Photo courtesy of Caldwell Contracting)
Metal roofs are an outstanding waterproof building component, as long as they don’t get penetrated. But they will be penetrated during installation, either to accommodate another building component or possibly an accident. Pipes, vents, supports, skylights and other roof protrusions are where leaks can develop due to their penetrations. Since penetrations are literally holes in a roof, and since holes in a roof cause leaks, it is critical that all penetrations be properly flashed and sealed to redirect water and prevent the possibility of it trickling into a roofing system.

Proper installation of roof penetrations for rooftop equipment is a critical component in a properly functioning roof system. (Photo courtesy of AEP Span)
Placement of the Penetrations
When planning roof penetrations, a key component is their placement. “Whenever possible, it is important to coordinate the plumbing and mechanical trades with the roofing installer,” says Kevin Arnold, sales engineer, Innovative Metals Co. Inc. (IMETCO), Norcross, Ga. “This step prevents potential problems such as pipes intersecting panel seams. You always want the pipes in the center of the roof panel pan whenever possible. The most common error that occurs flashing out a roof penetration is to have a vent pipe too close to a panel seam and installing a pipe boot over it and up the seam. This application creates a water dam and leaks. It also can impede expansion and contraction of the roof panel.”
Expansion and Contraction
When installing roof panels over a pipe penetration, it is critical to allow for thermal expansion and contraction of the roof panel itself. Thermal expansion can cause roof materials to tear apart when exposed to cycling sun and temperature changes.
Roof panels are typically fixed to the roof structure either at the ridge, mid-point or, in some instances, the eave. Because of this, Arnold explains that, “A penetration halfway down the roof slope, which is stationary, must account for the roof panel movement around that stationary pipe. This is typically achieved with an oversized hole in the roof panel around the pipe. The oversized hole should account for the expected thermal expansion/contraction of the roof panel.”

The correct roof flashing will provide a watertight seal over a penetration. (Photo courtesy of Deks North America Inc.)
Skylights
Most skylights are installed with a combination of end wall and side wall trims. Large penetrations (greater than 30 inches in width) typically require a cricket to divert water around the penetration.
For skylight installation, Arnold recommends a curb-mounted skylight; this allows the flashings to have a proper height, especially on lower-sloped roofs. “A key component in flashing a skylight is to have a proper clearance between the panel seam and the adjacent side of the skylight. The location of the skylight on the roof slope plays a role as well. You don’t want to create a choke point for water flow. In instances where the seam falls too close to the curb, we require the flashing to extend out to the next panel seam to have unobstructed water flow.”
Arnold cautions a common error occurring when flashing out a skylight or roof curb is to create back water laps. “Contractors come in after the roof is installed and install skylights, mechanical curbs, etc., and just apply the unit directly over the roof panels. The unit is set in a sealant, with no consideration for proper shingle-lap design and watershed.”

Sealant application. (Photo courtesy of Triangle Fastener Corp.)
Flash the Penetrations
To flash roof penetrations, the most common material for a pipe boot is ethylene propylene diene monomer (EPDM) rubber. Boots are available in standard slip-over styles as well as a retrofit style if the boot can’t be slid on. For high-heat stacks, silicone boots are available. Pipe boots do not require special tools or complicated installation methods. Many are marked with pipe dimensions, in both inches and millimeters so they can be customized with snips or scissors.
“Use commercial-quality pipe boots,” advises Arnold. “They are made of more stable, long-lasting materials with proper wall thicknesses (i.e., Dektite, Portals-Plus and Master Flash). “To install a pipe boot, you want to apply a butyl sealant onto the boot flange, and then set the boot on the panel. Apply #66 stainless steel closed-end rivets at 1.5-inches off-center around the boot. Then install a bead of clear tripolymer sealant around the perimeter edge of the boot as a secondary seal.”
The slope’s roof has an impact on penetration flashing. If the roof is flat, use a flashing that accommodates a 90-degree pipe angle. However, a sloped roof requires an angled flashing and is designed to work with the slope.
A vent-pipe’s diameter matters; choose a flashing with a correctly sized opening for the pipe size exiting the roof. Never try to slide a smaller flashing collar over a larger pipe because it will cause fatigue failure in the collar. Never install a larger collar over a smaller pipe and try to use sealant to fill the void. Any sizing miscalculations will cause building leaks.
An Accidental Penetration
There are different options to repair an accidental penetration on a metal roof depending on the extent of the damage. It also depends on what the manufacturer is willing to accept if they are providing a watertight warranty.
“When a roof is damaged when it is installed, we exchange the complete piece to give a guarantee and, above all, guarantee the owner that his roof will be useful for many years,” says Gustavo Gutierrez, owner, GGG Roofing, Houston.
“If the roof panel is symmetrical in configuration, the first recommendation would be to replace the roof panel in its entirety,” Arnold says. “The second option to that would be to provide a patch that would be applied over the damaged area, if the area is small. The patch can be made from a small piece of another roof panel, especially if the panel has a mechanical finish in the pan of the panel, or a small piece of flat material. The patch should overlap the damaged area at least 3 to 4 inches. The patch is applied like a pipe boot by setting it in a bed of butyl sealant. Install #44 closed-end rivets at 1.5-inches off-center around the perimeter of the patch. Lastly, install a bead of clear tripolymer sealant around the perimeter of the patch.”