Learning light-gauge steel floor installation
More and more light-gauge steel is being installed in floor applications. Steel’s noncombustibility, termite resistance and dimensional stability lower construction and building ownership costs. “Although light-gauge floor joists and floor trusses have been available for a number of years, it seems that only recently construction professionals have begun incorporating them in projects on a more frequent basis,” says Mike Noonan, vice president of marketing at Cascade Manufacturing Co., Cascade, Iowa.
 When following manufacturers’ specifications, installing light-gauge steel floor assemblies is relatively easy with basic steel framing tools. Floor joist spans are usually limited to 20 to 25 feet, whereas floor trusses have greater span capacity with increased depths.
Light-gauge steel floors are often installed by drywall and metal stud subcontractors. “The more trades involved in a project, the more difficult it may be to coordinate them,” Noonan says. “If the same subcontractor is installing the floor framing, walls and roof, as well as hanging the sheetrock, they often stay on-site until the building is enclosed. This may be a major benefit to the owner/developer; saving a large amount of time in the building’s completion.” The following installation advice will ensure this completion is done correctly.
Joist and truss
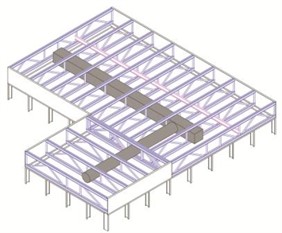
There essentially are two types of light-gauge steel floor products. One derives its name from how it looks: a deep C-shaped member often referred to as a floor joist. It is rollformed to the required depth and gauge. The second floor product is referred to as a truss. It is a fabricated component that consists of top and bottom members mechanically attached to intersecting web members. Both joists and trusses are designed to distribute the specified loads to exterior bearing.
Both of these floor materials are commonly used. The floor joist may be utilized for when a shallow depth is desired and for short-span conditions. The floor truss can span greater distances and be fabricated to depths deeper that the floor joist. Both systems allow for piping and ductwork to pass through the component at a perpendicular angle to the member. Due to the greater depths that can be achieved, the floor truss may accommodate larger sized ductwork. Both floor joists and floor trusses use similar installation techniques.
Before the floor
Many of the most important light-gauge floor installation steps should be completed before the floor is delivered. According to Noonan, they are:
• Have HVAC and MEP subcontractors review the proposed floor layout to determine if there is any conflict with ductwork running perpendicular to the floor assembly. The time to review this is during the shop drawing review phase of a project, before anything is built.
• Verify that the proposed framing plan dimensions match up with those on the job site. Are interior bearing walls, if utilized, in the correct location relative to the joist or truss layout?
• Confirm that the floor supplier’s installation plan is the most current framing plan that has incorporated any and all changes. The best way to ensure the installer in the field is using an updated copy is to have a copy of the final framing plan delivered with the first load of floor material.
• Have the correct attachment clips on-site when installation begins, as the installation can’t begin without the right attachment clips. Also, be certain to have the fasteners to attach the clip to the truss and to the bearing. Most often, the fasteners are either a powder-actuated pin or a screw fastener.
A level and defect-free foundation is key to the successful installation of a steel floor system. “If a foundation is not level, load-bearing shims or nonshrink grout are acceptable ways of creating a uniform bearing surface with a maximum 1/4-inch gap between the rim track and the foundation,” says Maribeth Rizzuto, LEED AP BD&C, managing director, Cold-Formed Steel Engineers Institute (CFSEI), Washington, D.C. “Floor systems are design to be fully braced, without taking into account torsion and lateral instability. This is because floor sheathings attached to the top flange of the joists and finished ceilings attached to the bottom flanges of the joists provide the necessary stability.”
Installation
Installing and framing a floor with cold-formed steel is approximately the same as framing a dimensionally framed wood floor. Michael C. Kerner, FASTM, CSI, CDT, code development manager at ClarkDietrich Building Systems, West Chester, Ohio, believes this is especially so when utilizing cold-formed steel framing such as TradeReady floor joist and TradeReady rim tracks, and gives the following installation steps.
• The rim tracks are placed at the perimeter of the framing, with care taken to make sure the pre-punched tabs align.
• The joists are then placed at 12-, 16-, 19.2- or 24-inch spacing and attached to the tabs on the rim tracks. No special reinforcing angles or connection pieces are needed.
• TradeReady blocking, ordered pre-cut to match the joist spacing, can be installed to brace the bottom flanges.
• Openings in the floors are framed with additional members as typically would be done.
• Once the floor is framed, the floor sheathing (wood, cement-type boards or metal decking) is attached.
Rizzuto believes installation procedures are driven by the system being used. “In the case of standard floor joists the joist is connected to the track leaving a 1/8-inch gap to ensure that there is web of the track is not in contact with the web of the joist,” she says. “The joist is typically attached with screws to the track with a web stiffener. Proprietary systems often have large openings to accommodate utility runs including plumbing and electrical. Some also have pretabbed rim tracks for the attachment of individual joist members.”
 Installation tools
No specialized tools are required for light-gauge steel floor joist installation. Kerner says conventional drills and chop saws are commonly used. “The TradeReady floor joist system can be ordered precut to length, without having to order to the next even foot and then having to throw away the cutoff,” he says. “Any field cutting can be done with conventional chop saws or a plasma arc welder.” Noonan says because floor trusses are made to the necessary size the primary tool for installation is the screw gun. “Cordless screw guns are popular,” he says. “Powder-actuated tools are used when fastening a bearing clip to structural steel. If an attachment clip needs to be welded to the bearing surface a welder would be required. Welding may only be performed on the attachment clip, not on the light-gauge joist or truss.”