Exposed fastener metal panel systems have been a popular choice on agricultural buildings for decades and have grown increasingly popular for other applications where longevity is needed.
Relatively easy to install resulting in a high-quality, classic metal panel look

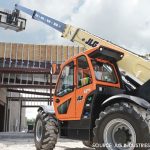
Exposed fastener metal panel installation (Photo courtesy of Triangle Fastener Corp.)
They usually have a corrugated rib or wave pattern with an overlapping joint design. Their key characteristic is fasteners (screws), which are directly secured through the face of the metal panel to the structure below. The panels overlap one another and a fastener is driven through both panels for attachment. The fastener head can be seen above the metal visibly lining the panel. This is more of a classic metal panel look than concealed fastener installation and makes for an easier installation process.

Screw installation (Photo courtesy of McElroy Metal)
Exposed fastener panels are available in a variety of gauges, materials and profiles. Installed vertically or horizontally, most can be used for both interior and exterior applications, including walls, roofs, fascias, ceilings, soffits, mansards and sheathing. Most exposed fastener panels are typically 36 inches wide, meaning that fewer panels (and less labor) will be needed to complete a project.
Installation
Exposed fastener panels install easily and quickly in most cases. Before starting, ensure the substructure to which the metal panels are fastened is properly spaced and sufficiently thick to provide a roof or wall system able to meet required design loads. Blake Batkoff, Midwest regional sales manager at Petersen Aluminum Corp., Elk Grove Village, Ill., says exposed fastener panels can be installed over a solid substrate such as plywood, but also could be installed on metal framing as well. “The load requirements for the wall or the local code would determine the spacing of the z’s or purlins.” Once determined and all underlying metal trim/flashing is installed, panel installation can begin.
Lane Osbon, technical specialist at McElroy Metal, Bossier City, La., says, “You should determine the direction the prevailing winds blow against the structures and start the installation from furthest point away from that direction. Install the sheets towards the wind direction. This keeps wind from blowing into a lap joint in the panels. Lay the leading edge to a reference plumb line for walls, and for roofs a line squared off the eave of the building.”
The good news for exposed fastener panel installation according to Osbon is, “Most exposed fastened panels install in the same fashion.” Batkoff agrees, saying, “There is no difference. Essentially, they install all the same way. The biggest error when installing these panels is lapping them incorrectly in the field. These should be lapped in a shingle fashion, so all the laps are going downhill.”

Exposed fastener metal panels (Photo courtesy of McElroy Metal)
“Specific installation procedures can vary depending on the style of panel, but generally fasteners should be applied on both sides of the rib at the eave and ridge, and then next to every rib every two feet along the length of the panel,” says Mason Burchette, owner and COO, True Metal Supply, Knoxville, Tenn. “It is generally recommended to install the fastener in the flat part of the panel next to the rib and not through the actual rib of the panel. Proper screw placement is important for proper performance and safety, but also for aesthetic purposes.”
Still, the diversity in available styles of exposed fastener metal panels can create differences in appropriate installation methods. For example, “Some rib designs like PBR panels have a trapezoidal rib that is conducive to using lap screws, and its tall rib height allows it to be used on low-slope applications,” Burchette says. “Other panel systems like 5-V Crimp feature a small, pointed rib that would make it difficult to use a lap screw with, and certainly is not suitable for low-slope applications. You should always refer to your manufacturer’s suggestions for your specific metal roofing system before beginning installation.”
Size, Shape and Slope
How does the size, shape and slope of a metal building affect its exposed fastener metal panel installation? According to Batkoff, “It really doesn’t matter, but the only Petersen profiles that should be used for a roof are R-36, 7.2 and the 7/8-inch corrugated panels. These are the most popular profiles.”
Burchette explains slope is a very important factor to consider when installing an exposed fastener metal panel. “On lower slope roof applications (lower than 3:12) a gasket-like butyl tape should be used with lap screws to ensure a leak-free panel overlap. Butyl tape is a tacky gasket material that runs along the length of the panel and prevents water from siphoning under the panel overlap. Lap screws are used to stitch panel overlaps together ensuring a snug fit against the butyl tape.”
Osbon explains, for low-slope roofs, “A taller seam height spaced further apart, gets the lap joint up higher out of the flood plane, and allows it to carry more water without building up depth to submerge the lap joint.”

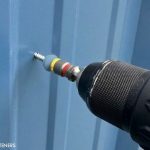
This fastener (screw) is directly secured through the face of the metal panel to the structure below. (Photo courtesy of True Metal Supply)
Fastener and Sealant
One of the most common mistakes when installing exposed fastener metal panels is improper installation of fasteners. “Over-torqued fasteners can break, damage the washers or damage the panels.
Under-torqued and angled fasteners do not properly seal the washer to the panel,” says Josh Krohn, engineering services manager, Triangle Fastener Corp., Cleveland. “All these scenarios can lead to leaks. To avoid this mistake, install fasteners perpendicular to the work surface. Let the drill point do the work. Do not apply too much pressure. Use a tool with torque control or a depth-sensing nose piece to prevent over-torqued and under-torqued screws. Do not use impact tools for installation! Using impact tools to install screws can cause the head to separate from the body due to the high torque and impulse generated by the tool.”
Installing the fastener in the rib of the panel is another common error. “This can seem logical at first because it would seem the fasteners would be exposed to less water runoff if installed through the rib; however, installing through the rib leaves a large portion of the fastener’s thread exposed and not ‘biting’ the roof deck,” Burchette says. “As thermal expansion occurs this fastener will back out significantly faster than if it were secured through the flat. Overtightening also becomes much more likely when installing in the rib and can dimple the rib creating leak points.”
Always use the correct sealant. “Roof panels can expand and contract due to significant temperature changes,” Krohn explains. “This movement can cause adhesion and cohesion failure of the sealant, which may result in leaks. To avoid this, choose a sealant that is flexible and made for metal panel applications. Choose a class 50 sealant, or better, that will form a durable bond and can be applied in a wide range of temperature and weather conditions.”

(Information courtesy of Triangle Fastener Corp.)