Preventing skylight installation errors
Skylights boost energy-saving daylight and ventilation while making spaces feel brighter and bigger. They are easily configurable and come in many options. But an improperly installed skylight can leak and cause problems. The following installation steps will help prevent that from happening.
Panel orientation
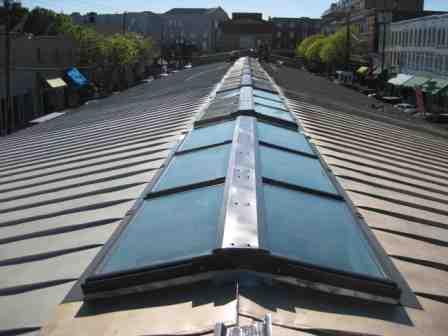
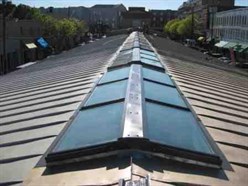
In-plane corrugated polycarbonate sheets make excellent skylights for metal roofs. Designed to match most metal roofing profiles, installing them correctly is relatively easy provided they are orientated correctly. According to Cassie Richards, marketing/communications manager at AmeriLux International, De Pere, Wis.: “Only one side of the polycarbonate sheet has a UV-protective surface. This exterior side must be installed toward the sun or exterior of the structure it is being used on. The other side of the sheet has little UV resistance and would be damaged by the sun.”
Pre-drill fixing holes An avoidable error that occurs during in-plane corrugated polycarbonate skylight installation is not predrilling oversized holes at fastening points. Allowing for the thermal expansion of the polycarbonate sheet is very important. It expands and contracts with temperature shifts throughout the day.
“Pre-drilling oversized fastener holes allows for this natural movement,” says Mark Weaver, technical support manager, Palram Americas Inc., Kutztown, Pa. “If oversized holes are not predrilled, the panels will likely bind against the fastener when it expands and contracts, which adds stress and will eventually crack the sheet and leak, or worse, completely tear off from the structure.”
Incorrect fastening
Correct fastener tightening is important for errorfree skylight installation. Over-tightened fasteners can also add stress to the panel, which causes problems such as distortion, panel damage and leakage. Under-tightened fasteners can also allow leakage. Weaver advises fasteners should be tightened to a point where the EPDM washers are firmly seated, without excessive bulging or looseness. He advises that these “umbrella” washers be used instead of Tek screws, which can result in over-tightening, dimpling, stressing and cracking.
 |
“Do not install polycarbonate sheets by nailing,” cautions Richards. “A self-drilling, self-tapping screw is recommended for metal substructures and a wood screw for wooden substructures. Fix with at least 1/2-inch neoprene bonded washer. Drive fasteners perpendicular to the sheet’s surface and tighten moderately.”
Incorrect flashing
Poorly designed or installed flashing systems around the skylight must not be permitted. The bottom and top corners are the most critical and difficult areas of the flashing process. In many cases, installers fail to do proper research on installation procedures and best practices. “At times the most difficult situations that arise are related to the installer’s first skylight installation experience on metal roofing,” says Wayne Quarles, product application coordinator for Velux America Inc., Greenwood, S.C. “Leaks can be prevented by simply flashing the skylight properly during the initial install. My experience has been that skylights are seldom the source of leaks; bad flashing details are usually the culprit. Caulking and roof cement are not commonly used in large quantities if the flashing details are done correctly.”
Sealant solution
A factor that must be considered for a successful skylight installation is sealant usage. As with any penetration cut into a metal roof, stopping leaks is significantly dependent on a sealant’s selection and its correct application.
Only use sealants that match or blend with the roofing system. “Many sealants designed for roofing applications contain high levels of solvents, which are highly incompatible with polycarbonate,” says Weaver. “These sealants attack and break down the polycarbonate quickly, resulting in cracking and leaks. Sealant compatibility should be verified with the sealant or polycarbonate manufacturer prior to installing.”
The areas the sealant are being applied to must be cleaned of oils and shavings must be removed. “Wash polycarbonate sheets with a clean says Richards. During and after installation, “Do not scrub or use brushes, brooms or any cleaning tool that may damage the sheet surface,” Richards adds. “Never use intense cleaning agents or glass window cleaners that may chemically attack the polycarbonate.”
The sealant will have an impact on the skylight’s fasteners. “The integrity of the installation is dependent on the fasteners used to secure the unit and apply pressure to keep water from seeping between the unit and the sealant, which is generally done with a tape that requires pressure to complete the seal,” says Randy Heather, sales engineer, Wasco Products Inc., Wells, Maine. “These fasteners, when installed, can strip out. If this occurs, the pressure needed to seal the unit to the roof is lost. This will allow water to get between the unit and the sealant.”
 |
When installing a skylight on a slope of less than 1/2:12, use a double layer of sealant on the bottom end lap to limit the wicking of water back up under the end lap. This wicking is known as capillary action. Using a double layer of sealant is commonly done for other types of roofing or glazing materials.
Other factors
There are hundreds of different metal roofing profiles. Some are very similar, although not exactly alike. Trying to force a polycarbonate skylight panel onto a non-matching metal profile will result in stress-related failure of the polycarbonate. To avoid this, Weaver suggests contacting the in-plane corrugated polycarbonate manufacturer and providing them with a sample of the metal profile. The manufacturer can thoroughly measure the metal panel and determine which polycarbonate profile would provide a suitable fit. “Palram’s MetalMatch technology allows the company to match virtually any type of corrugated metal profile, with much lower minimums than any other manufacturer,” Weaver says.
Another factor that installers must take into account is the roof load requirements found in local building codes. Polycarbonate is a thermoplastic; it does not have the same rigidity as metal panels. By implementing detailed load/span information available from polycarbonate manufacturers’ installation guides, an unsafe installation resulting in the panels collapsing, or pulling off under heavy wind or snow loads can be avoided.
Cutting the hole for the skylight is typically not a problem if the skylight is being installed when the metal roofing system is initially installed. Cutting the hole is a more difficult process when retrofitting a skylight into an existing metal roof system and could prompt installation issues. To remedy this, Quarles reminds installers not to underestimate the time and material required to properly install a skylight in a retrofit application.
“We all know time is money and when installers start running out of time or money the next step is to start taking short cuts such as caulking the critical areas rather than using additional resources to do the job properly,” he says. “It is always a good practice to wrap the skylight in a self-adhesive underlayment to provide a tight seal around the skylight curb or frame to the roof decking. Be sure to use a high-temp grade underlayment approved for use under metal roofing.”
Learning to stop leaks
A great source of information for skylight installation tips is metal roof manufacturers who know the errorfree installation methods. Also, the National Roofing Contractors Association, architectural sheet metal manuals and industry-related publications have pertinent information to ensure an error-free installation.
Quarles urges installers to learn from these resources but more importantly take a commonsense approach to eliminating errors. “Do your homework upfront to ensure the proper materials have been ordered to do the job correctly,” he says. “Always ask yourself,
‘Do I have the proper materials, skylight, underlayment, flashing and trim accessories, tools, and skilled labor or craftsman to do the job correctly?’ Allow the appropriate time required to do the job correctly.”
[sidebar]
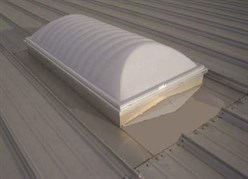
Roof Curbs and Skylight Installation
Where we see the installation of skylights going wrong is by installing the wrong roof curb or the incorrect installation of the right roof curb. Roof curbs must have curb base flanges to match the roof panel manufacturer’s seam configuration. The highs must fit under the roof panels on the up slope and over the roof panels on the down slope to create a continuous water flow. The base sides must extend to the next natural seam or lap joint of the roof panel which allows the roof curb to become an integral part of the roof system.
This method of installation of under/over is the best design
(with proper support) to prevent roof leaks and allows the roof curb to be installed during or after the roof panels have been installed. Over/over and under/ under roof curb designs are not the best design because of the high possibility of water penetration. The over/over and under/under design creates a damming effect which makes the roof curb penetration completely reliant on caulk and sealant tape.
Standard features of a roof curb should include a minimum height of 8 inches on lower slopes and 12 inches on steeper slopes above the finished roof. There should be enough clearance (a minimum of 6 inches sometimes more depending on the width of the curb and location in the roof system) from each side of the vertical curb wall to the panel seam/lap joint to allow adequate water flow around it.
Clay Funderburk, vice president for LMCurbs, Longview, Texas