Here’s how to stay on top of underlayment installation
A roofing underlayment is a membrane that prevents water penetration. Compared to exterior roof-covering materials like metal or shingles, underlayment is the secondary barrier to moisture penetration. If the roofing underlayment is installed correctly, water that penetrates the exterior roofing materials will drain out to the exterior and away for the building. Without correct installation, water from wind-driven rain or ice dams can severely damage a roof, or even worse, the inside of buildings. The following installation tips can prevent that from happening.
Even before installation
Even before underlayment installation, determine if a permit is required for roof underlayment installation by local building authorities. If one is required, post it on the job site as required.
Ensure that the underlayment being used is compliant with the roof’s specifications and application. Are there special requirements, particularly before installing underlayment on copper or zinc metal roofing? Applicators should follow the underlayment manufacturer’s published application guidelines. Verify the delivered underlayment’s model number, grade, finish, size, options and quantity match the order precisely. Thoroughly inspect all underlayment materials for damage and proper operation.
The size and shape of the roof dictates how much underlayment material will be needed. “If the geometry of the roof is weird, then you’ll tend to have more scrap,” says Dave Rowe, product development director at Englert Inc., Perth Amboy, N.J. “Find the square footage of the roof for underlayment by measuring the length and width of each portion of the roof, multiplying length by width for each plane, and adding the planes together for the total square footage. It is also important to understand the total number of square feet of material required including end laps and side laps.” The overage/waste should be less than 7.5 percent of calculated expectations.
Prepare the area for safe, efficient work and move items that restrict work access, or are vulnerable to damage. Cover and protect items that cannot be moved. Avoid roof falls by using safety harnesses, roof jacks and other safety equipment. Mark edges for safety. Always use caution when standing or walking on any underlayment product. “Be aware of safety,” cautions John R. Crookston, foreman at UpRight Inc., Kalamazoo, Mich. “I believe the safety aspect is probably the most ignored.”
Deck preparation
For successful underlayment installation, roof deck preparation is critical. Voids or gaps in the deck need to be filled and decking protrusions need to be removed before installing the underlayment. Also, the roof deck surface must be smooth, clean, dry (not damp) and free from contaminants. Wood decking may require a minimum of 24 hours to dry if it is wet.
“The surfaces of oriented strand board (OSB), plywood sheathing and insulation board may contain wax, sawdust or other foreign substances,” says David Delcoma, product marketing manager, MFM Building Products Corp., Coshocton, Ohio. “Use an approved primer as necessary to achieve maximum adhesion of the underlayment to the roof deck. Typically, masonry, OSB, aged metal and concrete roof decks must be primed.”
“Membrane adhesion tests should be conducted on questionable substrates to ensure proper adhesion and to determine if approved primer is required for particular substrates,” Rowe says.
Underlayment installation steps
In general, all underlayments are installed in the same manner, starting at the low point of the roof deck and moving upwards, regardless of the material type. “The underlayment’s composition determines the slope, approved final roof covering, installation temperatures and fastening options,” says Delcoma.
“For self-adhering underlayments, no fasteners are required. For those underlayments that require mechanical fastening, the manufacturer will specify what type and size of fastener is required.”
The following installation steps are provided by Little Rock, Ark.-based Tarco:
• Cut the self-adhering underlayment to suitable, manageable lengths before application.
• Prime all metal flashings, leads, eave and rake metal drip edges and vertical approved substrates with ASTM D41 asphalt primer, water-based acrylic primer or water-based polymer modified primer.
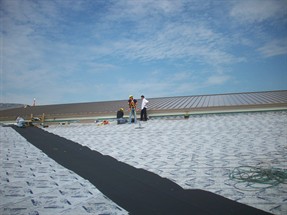
• Install first course of underlayment parallel to the eave edge.
• Apply the underlayment working from the center of the material continuously to the ends of the sheet. Half of the length of the sheet is the center. Avoid wrinkles and ridges.
• If one course of material becomes misaligned, do not continue to apply courses as this will lead to wrinkles and fish mouths. If any course gets misaligned, start over again.
• Remove the split release film following a proven technique, or by folding the membrane over and removing one half of the split release film. Then fold the membrane back into place one side at a time.
• The split release film should be removed in a continuous fashion one side at a time. Roll or broom the entire membrane surface, paying special attention to all overlap areas (side laps, end laps, T-Joints) to ensure adhesion with acceptable substrates.
• Allow for all end laps to be a minimum of 6 inches and head/side laps to be a minimum of 3 inches.
• Stagger all end laps a minimum of 36 inches from the preceding course on low slopes (<2:12 pitch) and a minimum of 18 inches from the preceding course on steep slopes (>2:12 pitch).
• Back nail the membrane on steep slopes (>2:12 pitch) or per applicable building code.
• Use a minimum of a 70-pound weighted roller for low slope
(<2:12 pitch) and a minimum of a 28-pound weighted roller for steep slopes (>2:12 pitch).
• The use of a soft bristled push broom may be used on steeper slopes.
• Apply SBS trowel-grade modified asphalt adhesive/flashing cement in between all granule-over-granule and fabric-over-fabric laps.
• Apply the SBS trowel grade modified asphalt adhesive/flashing cement at a rate of 1/8-inch thick throughout the minimum 6-inch end lap contact area.
• Once this procedure has been completed, the underlayment must then be hand rolled in place in order to ensure contact of the underlayment to itself and achieve a minimum of 1/8-inch asphaltic bleed out in the designated area.
• Certain underlayments will adhere to themselves therefore not requiring the use of the SBS trowel grade modified asphalt adhesive/flashing cement in between the 6-inch end lap contact area.
 Eaves, corners and valleys
Installing underlayment on a roof’s special features, like eaves, corners and valleys, requires special instructions. “Normally, we will install a self-adhered underlayment on the bottom eave and in the valleys,” Crookston says. “We will carry it up the walls several inches to seal it. This self-adhered underlayment should be carried up at least 2 feet inside the outside wall for ice buildup. We install the valleys first, and then install the lower sheets starting at the eave and working up. If you install the bottom sheets first and then install the valley sheet over the top of them, it will leak.”
A final step in underlayment installation is metal flashing. To reinforce roof valleys and edges, flashing provides extra strength and barrier properties. Edges are the most susceptible to water damage and need more protection. Water collects in valleys, thus additional water sealant is needed. These specialized areas of flashing require a minimum of 6-inch underlayment overlap to accommodate and withstand the structural movement common around them.
Underlayment installation mistakes
Ignorance is a common cause of underlayment installation mistakes. “The most common mistake contractors make when installing roof underlayments is that they have not made themselves familiar with the underlayment manufacturers’ approved substrates or published application guidelines,” says Steve Ratcliff, president and CEO of Tarco. “This can be easily overcome by either contacting the underlayment manufacturer directly, or visiting their website and researching the underlayment application guidelines.”
 Ironically, a common mistake in underlayment installation is to rely too heavily on the underlay underlayment for the roof’s waterproofing. “On a flatter pitched roof, the doubling of the felts gave some added protection with shingles, but we installed thousands of roofs in the 1950s, 1960s and 1970s with no felt at all,” Crookston says. “If a roof has to sit exposed to the elements, a good underlayment installation will keep the building dry until the roof is installed. If a person could install the shingles and then jerk the underlayment out from beneath them and the roof was correctly installed, there would be no leaks. However, most roofers today rely on the self-adhered membranes for the waterproofing and they just throw the shingles on. Eventually, it will come back to bite them.”
To learn more about correct underlayment installation techniques and avoid other common installation mistakes, refer to the Rosemont, Ill.-based National Roofing Contractors Association.
sidebar
Temperature and installation
For successful underlayment installation, temperatures must be considered. Warm temperatures coupled with dry substrates enhance the underlayment adhesion process. Cold temperatures coupled with wet substrates will not only lessen, but may even prevent adhesion. “For self-adhered products, we strongly suggest that it be 40F and rising in order for the product to work best,” says Robert Anderson, metal products manager at Firestone Building Products, Indianapolis. “At colder temperatures, material becomes less flexible and won’t stick.”
But hotter temperatures can be problematic too. “If it is very hot and one is installing a very sticky underlayment, you only have a short time to have the sheet exposed before it becomes almost impossible to get it down flat,” says John R. Crookston, foreman at UpRight Inc., Kalamazoo, Mich. “It is like contact cement.”
When selecting self-adhering underlayments, consider potential heat gain issues. These occur from combining roofing materials with climate, elevation, insulation and ventilation. “Metal roofing and rigid insulation/spray PU foams under metal can all contribute to a hotter roof,” says Dave Baur, product manager of residential waterproofing at W.R. Grace and Co., Cambridge, Mass. “Grace recommends using its Ice and Water Shield HT in hot roof assemblies. Under Cor-Ten, zinc and copper, we recommend using Ultra, which has a maximum service temperature of 300 F.”