Construction technology has improved considerably during the past 40 years. Building contractors have the most advanced equipment and materials at their disposal to ensure that their construction projects will be completed in the most efficient and economical way possible. Despite the technology, there are still those nagging job-site callbacks to repair a leak in the roof or correct a detail that was inadvertently overlooked during construction.
The intent of this article is to address important details relative to fasteners, sealants and flashings that often are overlooked during construction. As a fastener supplier to the construction industry, we often receive telephone calls from a contractor or building owner stating that the “fasteners are leaking.” In the end, after a visit to the job site or after conversations, it is determined the cause of the roof leak was not the fault of the fastener, but rather a faulty detail that may or may not have involved a fastener at all. Following is a review of a few of the most common details that can be of concern to contractors and building erectors.
Lick Leaks
A common culprit for the majority of roof leaks relates to the improper use of side-lap and/or end-lap sealant. Side-lap sealant has only one purpose: to stop the entrance of water through the lapped panels. It will perform this task easily if proper care is taken during its installation. A side-lap fastener specifically designed for securing the side-lapped panel is then installed at intervals along the lapped panels to ensure that the sealant is properly compressed and that the relationship of the lapped panels is properly maintained.
Illustration 1 illustrates the proper relationship of side-lap sealant to the overlapped edges of the panel. The correct location for the sealant is along the edge of the lap where water will first enter the lap. The side-lap stitch fastener must then be located on the “dry” side of the sealant. Sometimes, during the placement of the sealant, the installer will allow the sealant to “snake” along the rib from one side of the rib to the other. When the release paper is pulled from the sealant, the sealant often is pulled away from the top of the rib and is hurriedly pressed down to the top of the rib, often in the incorrect position.
 Once the overlapping sheet is in place with the sealant on the incorrect side of the lap rib, the side-lap stitch fastener can be located improperly as shown in Illustration B. Should water fl ood the rib, the fastener is now on the wet side of the lap and water can enter the building through the hole in the lower panel.
It is unclear, when viewing the lapped ribs from the surface of the roof, which fasteners are properly located and which are not. A simple test can determine those improperly located fasteners. A flexible plastic card (or business card) inserted into the lap adjacent to each stitch fastener should contact the sealant before it reaches the fastener line. If it does not, that fastener location is a candidate for a leak.
 Further investigation and repair is necessary. Sealant location relative to the fastener is equally important in an end-lap condition as shown in Illustration C. The same business card test can determine the location of the sealant relative to the fastener line.
If side-lap sealant is not used in conjunction with the roof panel laps, the risk is great that wind-driven water can pass through the side lap and into the building. Secondary drain channels often are provided on some agricultural panel profiles to direct water down the slope and off the building. Care should be taken so as not to penetrate the drain channel with a stitch fastener or the function of the drain channel will be compromised and a leak may occur.
Going Into Overdrive
Roof slope plays an important role in determining the lap details to use. For those panel designs that have a defined drain channel, the prevailing wind direction should be considered when planning in which direction the panels are to be lapped and from which end of the building to begin erecting the panels. The overlapped edge of the panel should be located on the leeward edge of the panel overlap. Lowsloped roof designs can present ice-damming conditions in the Northern winter climates that make additional side-lap fastening necessary.
The technique of installing the roof and wall fasteners is an important issue, allowing the fasteners to provide their expected longterm weathertight function. Every fastener is important to the life of the roof and, therefore, must be installed correctly. Overdriving or underdriving the fastener is a common cause of fastener-related job-site issues.
Pick Your Poison
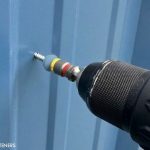
Every installation has limiting criteria that affect the proper selection of the installation tool. Self-drilling fasteners, for example, require a screwdriver that has a drill speed ideal for the diameter of the specific screw, a depth-sensing feature that prevents the screw from being overdriven or underdriven, and the amperage rating to provide constant cutting speed to the drill tip for maximum drilling efficiency. A properly maintained driving bit/socket that is the correct size for the screw being driven is important to maintain the protective finish on the fastener.
There are many types of installation tools available today, both corded and cordless. The motor speed varies from 450 to 4,000 rpm; tools are available in variable-speed, fixed speed and with reversing features. Additional features include adjustable torque, positive clutch and depth-sensing types. The choices for selecting a screwdriver seem endless. It is not surprising, therefore, that there are so many incorrect screwdrivers being used for installing self-drilling screws into steel building girts and purlins. The most appropriate screwdriver for No. 12 and No. 1/4 diameter self-drilling fasteners used in the steel building industry is a corded variable speed 0 to 2,000 rpm, depthsensing (not torque-sensing) screwdriver with a minimum 6.0-amp rating. The depth-sensing feature is essential for the correct installation of every fastener on the entire roof.
A no-load speed of 1,800 to 2,000 rpm is the ideal speed for installing No. 12 and No. 1/4 diameter self-drilling screws into metal building purlins and girts, given the hardness of steel normally used for these components. A screwdriver with a speed up to 2,500 rpm can be used when installing roofing fasteners through steel panels into wood-framed buildings.
Under no circumstances should a 4,000 drywall type tool be used to install No. 12 selfdrilling fasteners into steel building purlins and girts. The rotation speed is too fast for efficient cutting of the No. 12 fastener’s drill point.
Seal It Up
It is recommended that all fasteners used to attach the panels to the structural members be located in the fl at of the panel, not the side laps. The side laps should be used for side-lap stitch fasteners only. All roof panels expand and contract to some degree with temperature changes after construction. Therefore, it is important to fasten the roof and wall panels in the flat of the panel to hold the sheets more securely in place and maintain a weathertight seal at the fastener penetrations. The EPDM rubber-sealing washer material used with the fasteners is formulated specifically to resist the effects of ultraviolet rays and ozone and will last indefinitely when properly installed.
Should the structural fasteners be located only in the crown of the panel, the effects of expansion and contraction can create a serious problem in some climate conditions. There is very little restraint from linear movement provided by a crown-fastened system as there is very little clamp load that can be applied to the fastener connection to resist the movement. Where the seasonal temperature swings are greatest, bending moments can occur on the fastener and, in some cases, can cause the fasteners to fatigue and break. Crown-fastened panels do not provide the resistance to wind uplift nor do they resist wind vibration as well as panels fastened in the flat of the panels.
Roof penetrations can be made weathertight with the use of special EPDM flashing units. Plumbing vents and electrical conduits that project through the roof require clearance between the metal roof and the vent to allow for expansion and contraction of the roof panel without damaging the vent or the roof panel. Today’s EPDM fl ashing units provide a simple solution to affect a weathertight seal and allow for movement within the detail. The upper conical portion of the flashing unit is cut on a premarked line corresponding to the diameter of the vent. The flashing unit is then slipped over the vent and positioned on the roof. The base of the flashing unit has a flexible aluminum band molded into the EPDM rubber and can be bent to conform to any rib profile of the metal roof. Caulking is applied under the band and then attached to the roof panel with stitch fasteners for a weathertight seal. Unlike plumbing vents, electrical conduits projecting through the roof are not always configured to allow the flashing unit to slip over the top of the conduit for flashing. There are “retrofit” flashing units that have one side of the flashing unit fitted with a special seam that allows the unit to be wrapped around the conduit or vent pipe for a weathertight installation. Simple instructions are included with each flashing unit for easily attaching and weatherproofing virtually any roof penetration.
Stay Warm
Fasteners and sealants are essential to providing weathertightness of any metal building. Their proper selection and use requires special attention by the contractor and installer to maintain the weathertightness expected of the metal building.
Tom Hulsey is the director of technical services and applications engineering for Tyler, Texasbased SEALTITE Building Fasteners. Visit www.sealtite.com.